27.10.16

Travelers notebook - the December edition


The buzz around town at the moment is all about December Daily.  Who is doing it! How they are doing it! etc. etc.  I was quite adamant this year that I was not going to do a December Daily, but it's hard not to get caught up in all the hype and with so many beautiful products on the market, it's just hard to say no.

I am still saying no to a December Daily.  Well in the original sense anyway.  Right now my latest obsession is travelers notebooks. I love the look, feel and the small space in which to document.  With all the amazing new Kellie Stamps that have been released for Christmas it was hard to say no, so I didn't LOL.

I am in the process of making a travelers notebook and it is here that I will document December.  I am not sure what I will be documenting.  I played with the idea of an art journal but the jury is still out on that one but  I still have a little time left to decide.  I am pre-making pages using digital papers from Sahin Designs and of course stamps from Kellie Stamps.


I have even had a go at creating my own pages/ pattern paper.  Those christmas trees are hand drawn by myself and then turned into a digital file (my other latest obsession).  Turning them into digital files means I can use them over and over again.  I created the page above and the page below using the same image.  


I love how simple pages like these, using my drawings plus stamps from Kellie Stamps makes such a huge impact in my travelers notebook.  I still have more pages to add and I will share these once the book is finished.

If you would like to know how to turn your drawings into digital files I recommend you check out  "Paint & Pixels" and "Doodled 2" over at Big Picture Classes. I highly recommend both classes.

Again, thanks for stopping by this week and checking out how I have used new the stamps from Kellie Stamps.  If you have any questions, please don't hesitate to leave them in the comments section.

Love me :-)

26.10.16

Project Life cards - Christmas


The best thing about digital stamps is that I can make PL journal cards in just a few moments.  I can make some ahead of time or I can just whip a few out while doing my PL and stick them straight into my album.

For these journal cards I have used several digital sets from Kellie Stamps:


One of my favourite things to do with both clear and digital stamps is to stamp an image multiple times in the form of a particular shape.  Here I have done a christmas tree using the fa lalala digital image. You can check out this post here and see how I have done the same thing using a clear stamp.


Please note: digital papers from Sahin Designs.

Thanks for stopping by. I hope that you are feeling a little inspired to try out the new digital or clear stamps from Kellie Stamps.

Happy stamping 
love me :-)


25.10.16

Naughts & Crosses... christmas style


Thank you for stopping by and checking out my next project using the new Kellie Stamps release.
This little project uses a combination of digital and clear stamps and I have to say I am really happy with how it came out.
Naughts and crosses is a childhood memory of mine.  I would play it for hours once I had convinced someone to play along.  Over the years I have made many versions of this game and as soon as I saw the images from the "Merry circle" digital set I knew that I had to make another one.

This is a very simple project and doesn't need much to pull it all together.

I had a calico bag (from an old Studio Calico kit) which I stamped with the "joy" stamp from the "merry Joy" clear stamp set.  I then printed out circled images from the "merry circle" digital set and then punched them out using my circle punch.  I stamped a santa hat on some and a christmas tree (I used a clear stamp here which was from a release last year, however it is now a digital stamp) on the others.  I made a small pad so that you can keep score (stamped with the same images as the circle game pieces).  The pencil is from Ikea - all I needed to do was to sand off the Ikea branding (which came off really easily) and then stamped the pencil so that it all matched.  I finished off my project by adding some red and green M&Ms as little gifts for the winner.


This little project is very quick and easy to put together and small enough to keep in your handbag to keep the little ones happy when you are out or as a fun little stocking filler.

Again, thanks for stopping by and please leave a comment if you have any questions.

Love me :-)

24.10.16

Joy - christmas card


Welcome to my second project using the new christmas release from Kellie Stamps.  This months clear and digital stamps are clever and it doesn't really matter what your style, you will be able to find something you just have to have.

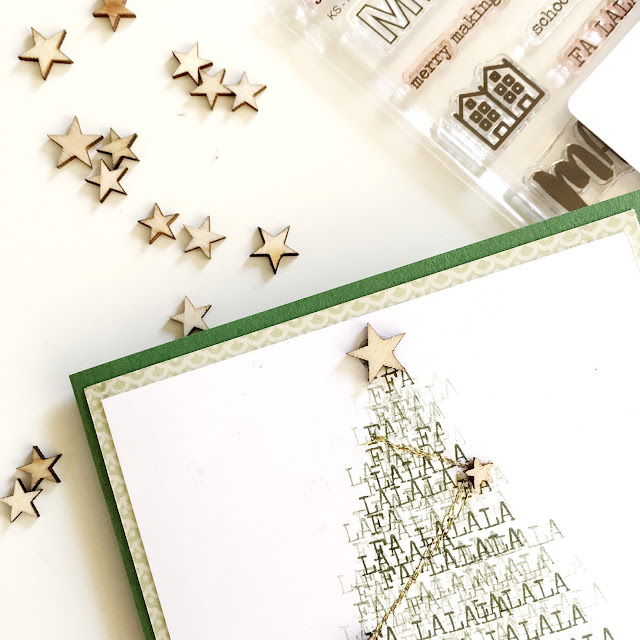
For this project I used a technique called "stamping off" which simply means that you ink your stamp, then stamp your image several times before re-inking it.  It gives to look of several different shades of the one colour.  So if you only have one stamp pad, by using this technique, it turns your one ink colour into several shades.  I started off by drawing a very light triangle, in pencil onto my cardstock.  Then I repeatedly stamped the same image image over and over again filling in the triangle.  Once I was happy with my stamped images and carefully rubbed out the pencil line.  Then I sewed some gold thread onto my tree shape to give the impression of tinsel, added some wooden stars.  I finished it off by adding a doily and the word joy to the bottom of my tree.

I used a stamp from the new clear set "merry joy".


I hope this little technique has inspired you to try it for yourself.  It is quite fun and takes away the "perfect stamped image" stress.

Enjoy your stamping
Love me :-)


23.10.16

Noel... christmas card


Here we are in October but Christmas is only a short time away and will be here before we know it.  With that in mind it's time to get organised for Christmas.  Today is release day over at Kellie Stamps and this month there is a whole lot to be excited about.  The Christmas release is so good, you are going to love it all.

All this week I hope to share my projects with you here, on my blog, with details on how/why for each one.
I am starting things off with this "noel" christmas card. The idea behind this came as I was scrolling through Pinterest and saw a picture of a rustic wreath with huge wooden letters either side, spelling out the word Noel.  I loved!  I couldn't move past this photo.  I loved the colours, the rustic feel and the simpleness of it.  My mind started to tick over and I wondered if I could re-create this is paper form.  I sat for a few days, thinking and pondering on exactly how I would do this.  I pulled out my stamps, looked at all the images and started designing my card.

I drew a very light circle (in pencil) onto my white card, giving me a template so that I would know where to position my stamp.  I decided on the "merry making" stamp image from the "Merry Joy" stamp set.  On my first attempt I was not overly happy with how it turned out.  The wreath didn't look right, out of proportion.  So I decided to ink and stamp just the "merry" part of the image and then stamped my first image with the beginning part of the word on the hand draw circle and the end of the image pointing out from the same circle just a little.  I then stamped the same image, without re-inking the stamp (to give a light stamped image) but this time the beginning of the image was stamped onto the hand drawn circle but the end of the image was pointing down a little to create the feel of branches/leaves.  I repeated this action all the way around the circle, but each time, alternating the first darker stamp image facing up then down. Hope that makes sense.  You should get the idea from the images.

Then I added some gold thread, wooden heart, gold paint and my letters.  Then it was simply a matter of putting layers together to form the base of the card.


Thanks for stopping by.
If you have any questions please don't hesitate to leave it in the comments section.

Love me :-)

2.10.16

#31minutesfor31days / #30DaysOfHome...


So... I wasn't going to take on any new projects, none at all.  I mean I have a pile of DT projects to get done and don't even get me started on Project Life.  I have so many "started" projects to finish yet what do I find myself doing today, starting another one.

I'm not sure how it happened really, I mean I saw all the buzz on Instagram but convinced myself that I did not need to get involved.  Then I thought, maybe I will just play along with the photo prompts, but that's it.  Then before I knew it I was in my craft room making a travelers notebook, printing out the prompts and BANG! Yep, I was right in the thick of it.

But in my defence, it is a cold, wet and windy day outside and all my housework is done along with my washing and ironing.  And the boys are away this weekend so I had the house all to myself.

Anyway, to keep myself sane during this project I am going to keep it simple (fingers crossed).  My Travelers Notebook has 32 pages, a stitched spine, little tabs with the prompt added and a determination to see a project through to the end - well near the end, you know, most pages done!


Here is prompt 1 - Wake Up

Actually this is what got me all excited about doing this project.  I was warm and snug in bed, reading "the girl on the train".  I decided to make some warm honey water and check out instagram.  That's when I saw all the details about #31minutesfor31days & #30daysofhome.  I glanced up at the window as I heard the rain starting to fall again.  I had a thought about how much I love waking up when it's cold and wet outside, all snuggled up in my bed watching the weather through the window.  Yep, I took a photo and that's how I got to this spot.


Happy documenting
love me :-)


 photo copyright.jpg
envye template.