Showing posts with label cards. Show all posts

16.1.18

Card making - my process...


I am in card making frenzy today as we are celebrating three birthdays tonight, two first birthday's and one sixteenth.  I thought I would share with you my process when making cards using digital products.  Over the past year or so I have been using digital products more and more because I love  that there is no limit as to how I can use them.  By far my most used digital kit is the "Oh Happy Day" digital scrapbook from Paislee Press by Liz Tamanaha.  There are so many choices in this kit to allow for any type of birthday that  is being celebrated, especially for the men in your life.  But again that is the advantage with digital products, I can even change the colour on most things so I really am unlimited with choice.

When I first start to put a card together using digital products, I start out in photoshop and play around with design, colours and embellishments.  Once I am happy with the basic design I print out all of the elements  (as seen in above photo).  I also "save as" the card design so that I can use it again.


My next step is to cut all the elements out.  Sometimes when I am designing the card in photoshop I may be torn between a few elements, not sure how I want the card to look.  If this happens I print out the extra pieces even if I am not sure if I will use them.  It's easier to do it as this stage because there is usually some space left on your initial print and it saves having to go back and print again and waste a whole sheet of cardstock.
When I was making two of these cards I was unsure if I wanted to include a number "one" or not on the card.  These cards are for my great niece and nephew who are turning one and I didn't know if I liked the look of the number on the card or not so I printed them out anyway.  As it turned out I loved how it looked on the card.  Making things with digital products is no different than physical product.  Sometimes things look better when you can play around with them physically.


The other thing I love about this digital kit is that I was able to use it to make a first birthday card as well as a sixteen birthday card.  Plus, two of the cards are for boys and one for a girl.  So as I said, digital is so versatile.


I have also go into the habit lately of making an extra card.  I figure I already have all the stuff out so  I might as well make an extra one to add to my stash.  For the card below all I have to do is add some number stickers to the front once I know what birthday is being celebrated.

I hope that you found this helpful and I hope that it may inspire you to give products a go.  If you have any questions please don't hesitate to leave them in the comments below.

Happy card making!
Love me :-)

9.1.18

Eat cake - birthday cards...


January is a busy time for us with Birthdays, lots of Birthdays.  So, that means lots of cards and one thing I am trying to do this year is to make my cards ahead of time, to be organised.  Usually I am sticking down pieces onto a card as I am walking out the door.

One thing that has made "being organised" possible is my move to digital elements and papers to make my cards.  I don't mean making a digital card and sending it via email, I mean using digital products to make my card making easier.  Since being on the Creative Team for Paislee Press I have learned to use digital elements/papers etc more and more.  I think I have said it before, but using digital products means that I can plan my project in photoshop, make sure I am happy with everything then print out all the pieces and put it together.

When I design a card in photoshop, once I am happy with my final product I save it as a PSE file so that all the layers are retained.  I do this so that if I need another card I can simply print it out as is or change things around if I need to before printing it out.  It also means  I can use the same card for a male or female, I just need to change the pattern paper or an element.  It's the same if I want to add numbers/age to the front of the card, if I need to redo the card I can just simply change the numbers to fit the situation.

Below is each of the cards after I have printed all the elements out and then put it together to create the card.  The last photo is what the cards looks like digitally.


Here are the cards in digital format:-
It also means I never run out of my favourite paper or embellishment, because all I have to do it print it out.  And it also means that I can stop hoarding all my cards.  You know what I mean, you make a card and you just love it and you just can't bear to give it away.  Now I can give it away and simply print off another one.

If you have any questions please leave them in the comments.

Thanks for stopping by and happy card making.
Love me :-)

Please note:  Digital papers and elements used are from the "Oh Happy Day" collection from Paislee Press available at The Lily Pad.


6.2.17

Birthday cards...


I have been making cards for many, many years.  I love making cards and my friends and family love receiving them.  However, even after all these years I still struggle with male cards.  Most of my "stash" is, well, girly and so finding something is quite tricky.  If I happen to have something that would suit a male card its usually very dark and very brown - neither of these things are even close to my style of creating. 

This past week my daughter has been waiting for me to make a birthday card for a very good friend of hers (male friend) who was turning 19.  I kept putting it off because I just couldn't find anything to make a card that I felt comfortable putting my name too.  But then Liz from Paislee Press sent us a new kit to play with and it just so happen to be a birthday kit.  The "Oh Happy Day" digital kit is so so good.  Its bright, clean, fresh and stylish... and perfect for any gender.  I could have kept making cards all day, I love the kit that much.

Within 20 minutes I had made a card for my daughter to give to her friend and a card for my niece. 


I think I might go and make some more cards for no other reason than I love this kit... and I am totally addicted to banners!

Have a great week.
Love me :-)

24.10.16

Joy - christmas card


Welcome to my second project using the new christmas release from Kellie Stamps.  This months clear and digital stamps are clever and it doesn't really matter what your style, you will be able to find something you just have to have.

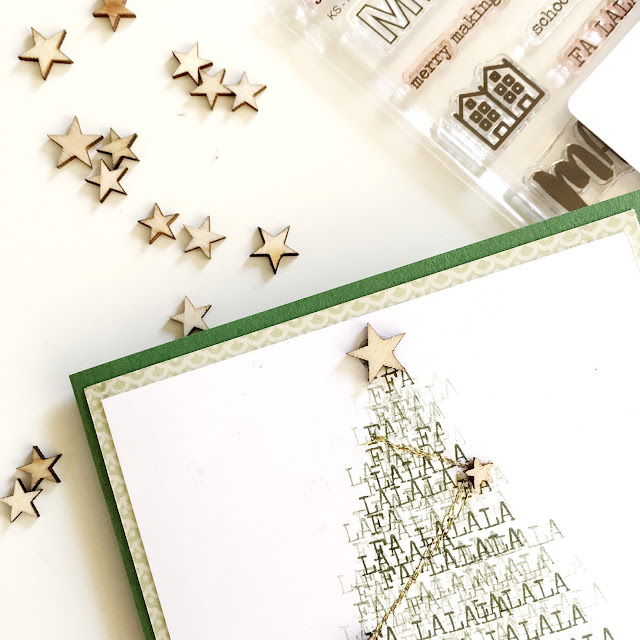
For this project I used a technique called "stamping off" which simply means that you ink your stamp, then stamp your image several times before re-inking it.  It gives to look of several different shades of the one colour.  So if you only have one stamp pad, by using this technique, it turns your one ink colour into several shades.  I started off by drawing a very light triangle, in pencil onto my cardstock.  Then I repeatedly stamped the same image image over and over again filling in the triangle.  Once I was happy with my stamped images and carefully rubbed out the pencil line.  Then I sewed some gold thread onto my tree shape to give the impression of tinsel, added some wooden stars.  I finished it off by adding a doily and the word joy to the bottom of my tree.

I used a stamp from the new clear set "merry joy".


I hope this little technique has inspired you to try it for yourself.  It is quite fun and takes away the "perfect stamped image" stress.

Enjoy your stamping
Love me :-)


23.10.16

Noel... christmas card


Here we are in October but Christmas is only a short time away and will be here before we know it.  With that in mind it's time to get organised for Christmas.  Today is release day over at Kellie Stamps and this month there is a whole lot to be excited about.  The Christmas release is so good, you are going to love it all.

All this week I hope to share my projects with you here, on my blog, with details on how/why for each one.
I am starting things off with this "noel" christmas card. The idea behind this came as I was scrolling through Pinterest and saw a picture of a rustic wreath with huge wooden letters either side, spelling out the word Noel.  I loved!  I couldn't move past this photo.  I loved the colours, the rustic feel and the simpleness of it.  My mind started to tick over and I wondered if I could re-create this is paper form.  I sat for a few days, thinking and pondering on exactly how I would do this.  I pulled out my stamps, looked at all the images and started designing my card.

I drew a very light circle (in pencil) onto my white card, giving me a template so that I would know where to position my stamp.  I decided on the "merry making" stamp image from the "Merry Joy" stamp set.  On my first attempt I was not overly happy with how it turned out.  The wreath didn't look right, out of proportion.  So I decided to ink and stamp just the "merry" part of the image and then stamped my first image with the beginning part of the word on the hand draw circle and the end of the image pointing out from the same circle just a little.  I then stamped the same image, without re-inking the stamp (to give a light stamped image) but this time the beginning of the image was stamped onto the hand drawn circle but the end of the image was pointing down a little to create the feel of branches/leaves.  I repeated this action all the way around the circle, but each time, alternating the first darker stamp image facing up then down. Hope that makes sense.  You should get the idea from the images.

Then I added some gold thread, wooden heart, gold paint and my letters.  Then it was simply a matter of putting layers together to form the base of the card.


Thanks for stopping by.
If you have any questions please don't hesitate to leave it in the comments section.

Love me :-)

28.8.16

hiphiphooray...


So excited to be able to share another project using the new digital stamp set "Eat More Cake" by Kellie Stamps.

I kept this one pretty simple by simply printing the greeting onto a white doily.  Totally thrilled how it came out and I finally used some of this pretty pattern paper from Stampin Up that I have been hoarding for ages.  It just seemed the perfect choice.

If you are wondering how I printed onto the doily, it's really simple.  I just printed my stamped image onto plain white printer paper.  I then placed my doily over the top of the image and attached it to the copy paper using washi tape.  I then put my paper back through the printer.  Washi tape is perfect for this because you can usually remove the washi tape without ripping your project.  I will admit that it was slightly more difficult to remove the tape from the doily but by taking it slowly, I managed to remove the tape without ripping anything.
I then added a little stitching and that beautiful glitter cork heart.


The digital stamp set is available now here.  If you prefer physical stamps, the clear stamp set is also available now for pre-order.

Thanks for stopping by.

Love me :-)

27.8.16

it's party time...


This is always a favourite time of the month for me, Release Day over a Kellie Stamps.

Head on over to pre-order the  "Eat More Cake" clear stamp set or if you are a digital fan then you can get your hands on the "Eat More Cake" digital set right now.

This is the first of a few projects that I will be sharing with you over the next few days.  First up, I am sharing a birthday card that I created using the digital stamp set.  Although I love the clear stamps, using the digital stamps gives me so much more freedom to create lots of different things.

For this project I used the digital stamp set and my Silhouette Cameo to cut out the balloons and to print and cut the words "celebrate" & "happy birthday".


So happy how this turned out although I did feel the pressure on this card.  My son asked if I could make him a card as he had been invited to a party.  
His comment "I need a card for tonight Mum, but it has to be really good, she's a really good friend."

Boys!!

love me :-)


 photo copyright.jpg
envye template.