22.12.16

Creative Team Member...

I am beyond thrilled to announce that I am part of the Creative Team for Paislee Press for 2017.  I have been using Paislee Press digital products for many years and I can't wait to share my projects with you.   I also cannot wait to work alongside this amazing group of creatives.

Cannot wait for 2017...
love me :-)

23.11.16

Kellie Stamps - Release November


It's release day over at Kellie Stamps and she is re-releasing two alphabet sets "stand tall" and "slim Jim", both of which just happen to by my favourites. Yes you heard right, they are coming back.  So many of you have requested them so they are back, but only for a short time.

Alphabet stamps are more than just letters and can be used for so many other things, not just titles.  As my son gets older his likes/dislikes, personality, fashion style etc changes.  Every year on their birthday, I take a zillion photos (not kidding) of my kids, nothing special, I just get them to stand near a blank wall and I just talk to them while I click away.  Most of the time the conversation is them telling me to "hurry up", "that's enough" or "why do you have to do this".  This gives me a tone of photos to choose from later.  Some are great shots, others are totally funny and some just catch them at their real selves.

 I was looking at my photos and these alphabet sets and the first thing that came to mind was a word sleuth.  I thought this would be such a fun way to document my son right now, at fourteen.  

Here is how I pulled it together:-

firstly I measured each alphabet leter stamp to see find out their size. Ithen drew lines on my white cardstock just slightly bigger than the stamp image.  I drew my lines very lightly in pencil so that I could rub them out when I finished.
I then stamped out each word in some of the blank boxes that I had drawn.  
Next, I got a black marker and filled in the stamped letters of the words that I wanted to highlight.
Once I had all the words stamped on my cardstock I then randomly stamped letters to fill up each black box and in turn filling up the entire sheet.
To finish off my layout I drew red circles around each word to highlight them further and to make it look just like a word sleuth.  Popped my photos on with a few embellishments and my layout was complete.


This was such a fun way to document my son, right now, at fourteen.  

Both stamp sets, "stand tall" and "slim jim" are available now at Kellie Stamps.  This is not a pre-order, they are available now but once they sell out they won't be coming back.  Oh, and if you are a newsletter subscriber you can get 10% of your order.

Happy stamping.
Love me :-)

27.10.16

Travelers notebook - the December edition


The buzz around town at the moment is all about December Daily.  Who is doing it! How they are doing it! etc. etc.  I was quite adamant this year that I was not going to do a December Daily, but it's hard not to get caught up in all the hype and with so many beautiful products on the market, it's just hard to say no.

I am still saying no to a December Daily.  Well in the original sense anyway.  Right now my latest obsession is travelers notebooks. I love the look, feel and the small space in which to document.  With all the amazing new Kellie Stamps that have been released for Christmas it was hard to say no, so I didn't LOL.

I am in the process of making a travelers notebook and it is here that I will document December.  I am not sure what I will be documenting.  I played with the idea of an art journal but the jury is still out on that one but  I still have a little time left to decide.  I am pre-making pages using digital papers from Sahin Designs and of course stamps from Kellie Stamps.


I have even had a go at creating my own pages/ pattern paper.  Those christmas trees are hand drawn by myself and then turned into a digital file (my other latest obsession).  Turning them into digital files means I can use them over and over again.  I created the page above and the page below using the same image.  


I love how simple pages like these, using my drawings plus stamps from Kellie Stamps makes such a huge impact in my travelers notebook.  I still have more pages to add and I will share these once the book is finished.

If you would like to know how to turn your drawings into digital files I recommend you check out  "Paint & Pixels" and "Doodled 2" over at Big Picture Classes. I highly recommend both classes.

Again, thanks for stopping by this week and checking out how I have used new the stamps from Kellie Stamps.  If you have any questions, please don't hesitate to leave them in the comments section.

Love me :-)

26.10.16

Project Life cards - Christmas


The best thing about digital stamps is that I can make PL journal cards in just a few moments.  I can make some ahead of time or I can just whip a few out while doing my PL and stick them straight into my album.

For these journal cards I have used several digital sets from Kellie Stamps:


One of my favourite things to do with both clear and digital stamps is to stamp an image multiple times in the form of a particular shape.  Here I have done a christmas tree using the fa lalala digital image. You can check out this post here and see how I have done the same thing using a clear stamp.


Please note: digital papers from Sahin Designs.

Thanks for stopping by. I hope that you are feeling a little inspired to try out the new digital or clear stamps from Kellie Stamps.

Happy stamping 
love me :-)


25.10.16

Naughts & Crosses... christmas style


Thank you for stopping by and checking out my next project using the new Kellie Stamps release.
This little project uses a combination of digital and clear stamps and I have to say I am really happy with how it came out.
Naughts and crosses is a childhood memory of mine.  I would play it for hours once I had convinced someone to play along.  Over the years I have made many versions of this game and as soon as I saw the images from the "Merry circle" digital set I knew that I had to make another one.

This is a very simple project and doesn't need much to pull it all together.

I had a calico bag (from an old Studio Calico kit) which I stamped with the "joy" stamp from the "merry Joy" clear stamp set.  I then printed out circled images from the "merry circle" digital set and then punched them out using my circle punch.  I stamped a santa hat on some and a christmas tree (I used a clear stamp here which was from a release last year, however it is now a digital stamp) on the others.  I made a small pad so that you can keep score (stamped with the same images as the circle game pieces).  The pencil is from Ikea - all I needed to do was to sand off the Ikea branding (which came off really easily) and then stamped the pencil so that it all matched.  I finished off my project by adding some red and green M&Ms as little gifts for the winner.


This little project is very quick and easy to put together and small enough to keep in your handbag to keep the little ones happy when you are out or as a fun little stocking filler.

Again, thanks for stopping by and please leave a comment if you have any questions.

Love me :-)

24.10.16

Joy - christmas card


Welcome to my second project using the new christmas release from Kellie Stamps.  This months clear and digital stamps are clever and it doesn't really matter what your style, you will be able to find something you just have to have.

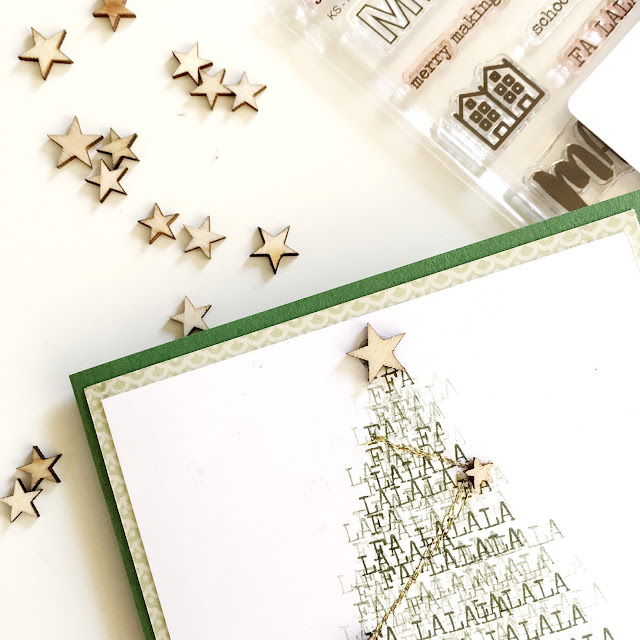
For this project I used a technique called "stamping off" which simply means that you ink your stamp, then stamp your image several times before re-inking it.  It gives to look of several different shades of the one colour.  So if you only have one stamp pad, by using this technique, it turns your one ink colour into several shades.  I started off by drawing a very light triangle, in pencil onto my cardstock.  Then I repeatedly stamped the same image image over and over again filling in the triangle.  Once I was happy with my stamped images and carefully rubbed out the pencil line.  Then I sewed some gold thread onto my tree shape to give the impression of tinsel, added some wooden stars.  I finished it off by adding a doily and the word joy to the bottom of my tree.

I used a stamp from the new clear set "merry joy".


I hope this little technique has inspired you to try it for yourself.  It is quite fun and takes away the "perfect stamped image" stress.

Enjoy your stamping
Love me :-)


23.10.16

Noel... christmas card


Here we are in October but Christmas is only a short time away and will be here before we know it.  With that in mind it's time to get organised for Christmas.  Today is release day over at Kellie Stamps and this month there is a whole lot to be excited about.  The Christmas release is so good, you are going to love it all.

All this week I hope to share my projects with you here, on my blog, with details on how/why for each one.
I am starting things off with this "noel" christmas card. The idea behind this came as I was scrolling through Pinterest and saw a picture of a rustic wreath with huge wooden letters either side, spelling out the word Noel.  I loved!  I couldn't move past this photo.  I loved the colours, the rustic feel and the simpleness of it.  My mind started to tick over and I wondered if I could re-create this is paper form.  I sat for a few days, thinking and pondering on exactly how I would do this.  I pulled out my stamps, looked at all the images and started designing my card.

I drew a very light circle (in pencil) onto my white card, giving me a template so that I would know where to position my stamp.  I decided on the "merry making" stamp image from the "Merry Joy" stamp set.  On my first attempt I was not overly happy with how it turned out.  The wreath didn't look right, out of proportion.  So I decided to ink and stamp just the "merry" part of the image and then stamped my first image with the beginning part of the word on the hand draw circle and the end of the image pointing out from the same circle just a little.  I then stamped the same image, without re-inking the stamp (to give a light stamped image) but this time the beginning of the image was stamped onto the hand drawn circle but the end of the image was pointing down a little to create the feel of branches/leaves.  I repeated this action all the way around the circle, but each time, alternating the first darker stamp image facing up then down. Hope that makes sense.  You should get the idea from the images.

Then I added some gold thread, wooden heart, gold paint and my letters.  Then it was simply a matter of putting layers together to form the base of the card.


Thanks for stopping by.
If you have any questions please don't hesitate to leave it in the comments section.

Love me :-)

2.10.16

#31minutesfor31days / #30DaysOfHome...


So... I wasn't going to take on any new projects, none at all.  I mean I have a pile of DT projects to get done and don't even get me started on Project Life.  I have so many "started" projects to finish yet what do I find myself doing today, starting another one.

I'm not sure how it happened really, I mean I saw all the buzz on Instagram but convinced myself that I did not need to get involved.  Then I thought, maybe I will just play along with the photo prompts, but that's it.  Then before I knew it I was in my craft room making a travelers notebook, printing out the prompts and BANG! Yep, I was right in the thick of it.

But in my defence, it is a cold, wet and windy day outside and all my housework is done along with my washing and ironing.  And the boys are away this weekend so I had the house all to myself.

Anyway, to keep myself sane during this project I am going to keep it simple (fingers crossed).  My Travelers Notebook has 32 pages, a stitched spine, little tabs with the prompt added and a determination to see a project through to the end - well near the end, you know, most pages done!


Here is prompt 1 - Wake Up

Actually this is what got me all excited about doing this project.  I was warm and snug in bed, reading "the girl on the train".  I decided to make some warm honey water and check out instagram.  That's when I saw all the details about #31minutesfor31days & #30daysofhome.  I glanced up at the window as I heard the rain starting to fall again.  I had a thought about how much I love waking up when it's cold and wet outside, all snuggled up in my bed watching the weather through the window.  Yep, I took a photo and that's how I got to this spot.


Happy documenting
love me :-)

27.9.16

LOVE layout...


Welcome to release day at Kellie Stamps and I have been finding it so hard not to share this layout with you using the new digital set "Happy Routine".

I need to be honest here though, for the past several weeks my mojo decided that it needed a holiday and just got up and went.  Left the building. I was struggling to get creative and with deadlines looming I was also starting to feel somewhat stressed.  During these times I find that doing something different or learning something different is a good way to get my mojo back.  One of my favourite places to learn from is Big Picture Classes so I headed to their site hoping to find a class that would kick my creative butt into gear.  

I found a class by Paige Taylor Evans (Paiges pages 1) now I absolutely love her pages but there is not way I could re-create them.  I have a much more simpler approach to my memory keeping and my pages are generally clean and not too cluttered.  But I sat through her class and wondered how I could create a page similar to hers but keeping it to my own style but I also wanted to be able to use digital files from Kellie Stamps that I needed to showcase.  I loved the page she did using the letters LOVE and decided to give this layout a try.  

WOW!  This has turned out to be my favourite layout ever.  Don't get me wrong it took a long time to get to this finished layout but trying something new was just what I needed.

In Paiges layout she painted the letters LOVE in watercolour, onto her layout and then adhered embellishments to each letter,  using embellishments the same colour of the letter.  

This was my take on her layout...

I hand painted the letters using watercolours (I used green and brown as they went with my photos).
Once the letters were dry I then scanned them into my computer.
I then turned them into digital files.
Next I added the digital stamps (in white) to each letter to create a pattern.
I then printed each letter out onto cardstock and then hand cut the letters out and adhered them to by white cardstock.
Then I embellished my layout.

here are a few more detailed photos...


This layout did take me quite some time, but once I figured out the scanned water coloured letters the rest came pretty easy.

You can find the class here from Big Picture classes to learn out to turn your watercolours into digital files.

"Happy Routine" clear stamp set is also available for pre-order here.

Thanks for stopping by and if you have any questions please leave them in the comments section.

Happy Stamping
Love me :-)

28.8.16

hiphiphooray...


So excited to be able to share another project using the new digital stamp set "Eat More Cake" by Kellie Stamps.

I kept this one pretty simple by simply printing the greeting onto a white doily.  Totally thrilled how it came out and I finally used some of this pretty pattern paper from Stampin Up that I have been hoarding for ages.  It just seemed the perfect choice.

If you are wondering how I printed onto the doily, it's really simple.  I just printed my stamped image onto plain white printer paper.  I then placed my doily over the top of the image and attached it to the copy paper using washi tape.  I then put my paper back through the printer.  Washi tape is perfect for this because you can usually remove the washi tape without ripping your project.  I will admit that it was slightly more difficult to remove the tape from the doily but by taking it slowly, I managed to remove the tape without ripping anything.
I then added a little stitching and that beautiful glitter cork heart.


The digital stamp set is available now here.  If you prefer physical stamps, the clear stamp set is also available now for pre-order.

Thanks for stopping by.

Love me :-)

27.8.16

it's party time...


This is always a favourite time of the month for me, Release Day over a Kellie Stamps.

Head on over to pre-order the  "Eat More Cake" clear stamp set or if you are a digital fan then you can get your hands on the "Eat More Cake" digital set right now.

This is the first of a few projects that I will be sharing with you over the next few days.  First up, I am sharing a birthday card that I created using the digital stamp set.  Although I love the clear stamps, using the digital stamps gives me so much more freedom to create lots of different things.

For this project I used the digital stamp set and my Silhouette Cameo to cut out the balloons and to print and cut the words "celebrate" & "happy birthday".


So happy how this turned out although I did feel the pressure on this card.  My son asked if I could make him a card as he had been invited to a party.  
His comment "I need a card for tonight Mum, but it has to be really good, she's a really good friend."

Boys!!

love me :-)

21.8.16

Pixel Me...


I was lucky enough to have last Thursday and Friday off from work and while I had many things to do I decided to just enjoy the day with lots of coffee and craft.
I was procrastinating over Project Life (doing that alot lately) and couldn't quite get into it so I made (another) coffee and sat on the couch with my ipad and did some pinteresting, blog reading etc.  I popped on over to Big Picture Classes to see if there was anything that appealed to me.  I came across "Custom Cross Stitch Characters" by Laura Wonsik.  What a totally fun idea and a fun class.  I haven't cross stitched in years but I couldn't wait to find my aida cloth and DMC threads and get into creating "pixel me".


I couldn't wait to start stitching but I soon had to put this project on hold because I didn't have any black DMC thread.  OMG I have just about every other colour but no black.  So off to the shops I went.


With black cotton in hand I continued to stitch my little character.  I changed the pattern slightly from my original as I felt I could make the pattern look more like me.


I even added a brad necklace and knew I wouldn't be complete without a coffee!!

This was such a fun project and I completed it all within just a few days.  There are some great hints and tips in the class for other ways to use your patterns.  Now lets see, who will I create next.

Love Me :-)

17.8.16

Plan that out!


Today over on Instagram, I am taking part in a IG Planner Hop for Kellie Stamps using the "Plan That Out" clear stamp set.
Although this stamp set was designed with planners in mind I wanted to share with you how versatile this stamp set is.  I used the set to create a layout.  I do use a planner but not one that I decorate etc but this stamp set was perfect for me to document just how crazy life is right now.  

This stamp set is available now and you can find it here.

You can follow along with the IG Planner hop by starting here with Amy.  There is a ton of inspiration that will be shared by the Kellie Stamps Creative Team so make sure you check it out.


 Love me :-)


 photo copyright.jpg
envye template.